一般程序,用于称重传感器的使用
Excitation Voltage

Figure 1. Full bridge circuit
Interface load cells all contain a full bridge circuit, which is shown in simplified form in Figure 1. Each leg is usually 350 ohms, except for the model series 1500 which has 700 ohm legs.
The preferred excitation voltage is 10 VDC, which guarantees the user the closest match to the original calibration performed at Interface. This is because the gage factor (sensitivity of the gages) is affected by temperature. Since heat dissipation in the gages is coupled to the flexure through a thin epoxy glue line, the gages are kept at a temperature very close to the ambient flexure temperature. However, the higher the power dissipation in the gages, the farther the gage temperature departs from the flexure temperature. Referring to Figure 2, notice that a 350 ohm bridge dissipates 286 mw at 10 VDC. Doubling the voltage to 20 VDC quadruples the dissipation to 1143 mw, which is a large amount of power in the small gages and thus causes a substantial increase in the temperature gradient from the gages to the flexure. Conversely, halving the voltage to 5 VDC lowers the dissipation to 71 mw, which is not significantly less than 286 mw.

Figure 2. Dissipation versus excitation
voltage (350 ohm bridge)
Operating a Low Profile cell at 20 VDC would decrease its sensitivity by about 0.07% from the Interface calibration, whereas operating it at 5 VDC would increase its sensitivity by less than 0.02%. Operating a cell at 5 or even 2.5 VDC in order to conserve power in portable equipment is a very common practice.
Certain portable data loggers electrically switch the excitation on for a very low proportion of the time to conserve power even further. If the duty cycle (percentage of “on” time) is only 5%, with 5 VDC excitation, the heating effect is a miniscule 3.6 mw, which could cause an increase in sensitivity of up to 0.023% from the Interface calibration.
Users having electronics which provide only AC excitation should set it to 10 VRMS, which would cause the same heat dissipation in the bridge gages as 10 VDC.
Variation in excitation voltage can also cause a small shift in zero balance and creep. This effect is most noticeable when the excitation voltage is first turned on. The obvious solution for this effect is to allow the load cell to stabilize by operating it with 10 VDC excitation for the time required for the gage temperatures to reach equilibrium. For critical calibrations this may require up to 30 minutes.
Since the excitation voltage is usually well regulated to reduce measurement errors, the effects of excitation voltage variation are typically not seen by users except when the voltage is first applied to the cell.
Remote Sensing of Excitation Voltage
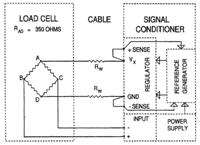
Figure 3. Four-wire connection
Many applications can make use of the four-wire connection shown in Figure 3. The signal conditioner generates a regulated excitation voltage, Vx, which is usually 10 VDC. The two wires carrying the excitation voltage to the load cell each have a line resistance, Rw. If the connecting cable is short enough, the drop in excitation voltage in the lines, caused by current flowing through Rw, will not be a problem.

Figure 4.
Six-wire remote sense connection
Figure 4 shows the solution for the line drop problem. By bringing two extra wires back from the load cell, we can connect the voltage right at the terminals of the load cell to the sensing circuits in the signal conditioner. Thus, the regulator circuit can maintain the excitation voltage at the load cell precisely at 10 VDC under all conditions.

Figure 5. Line drop versus temperature
for common cable sizes
This six-wire circuit not only corrects for the drop in the wires, but also corrects for changes in wire resistance due to temperature. Figure 5 shows the magnitude of the errors generated by the use of the four-wire cable, for three common sizes of cables.
The graph can be interpolated for other wire sizes by noting that each step increase in wire size increases resistance (and thus line drop) by a factor of 1.26 times. The graph can also be used to calculate the error for different cable lengths by calculating the ratio of the length to 100 feet, and multiplying that ratio times the value from the graph.
The temperature range of the graph may seem broader than necessary, and that is true for most applications. However, consider a #28AWG cable which runs mostly outside to a weigh station in winter, at 20 degrees F. When the sun shines on the cable in summer, the cable temperature could rise to over 140 degrees F. The error would rise from –3.2% RDG to –4.2% RDG, a shift of –1.0% RDG.
If the load on the cable is increased from one load cell to four load cells, the drops would be four times worse. Thus, for example, a 100-foot #22AWG cable would have an error at 80 degrees F of (4 x 0.938) = 3.752% RDG.
These errors are so substantial that standard practice for all multiple-cell installations is to use a signal conditioner having remote sense capability, and to use a six-wire cable out to the junction box which interconnects the four cells. Keeping in mind that a large truck scale could have as many as 16 load cells, it is critical to address the issue of cable resistance for every installation.
Simple rules of thumb which are easy to remember:
- The resistance of 100 feet of #22AWG cable (both wires in the loop) is 3.24 ohms at 70 degrees F.
- Each three steps in wire size doubles the resistance, or one step increases the resistance by a factor of 1.26 times.
- The temperature coefficient of resistance of annealed copper wire is 23% per 100 degrees F.
From these constants it is possible to calculate the loop resistance for any combination of wire size, cable length, and temperature.
Physical Mounting: “Dead” and “Live” End
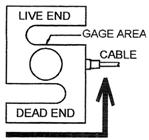
Figure 6. Loading ends of S-cell
Although a load cell will function no matter how it is oriented and whether it is operated in tension mode or compression mode, mounting the cell properly is very important to ensure that the cell will give the most stable readings of which it is capable.
All load cells have a “dead” end and a “live” end. The dead end is defined as the mounting end which is directly connected to the output cable or connector by solid metal, as shown by the heavy arrow in Figure 6. Conversely, the live end is separated from the output cable or connector by the gage area of the flexure.
This concept is significant, because mounting a cell on its live end makes it subject to forces introduced by moving or pulling the cable, whereas mounting it on the dead end ensures that the forces coming in through the cable are shunted to the mounting instead of being measured by the load cell.
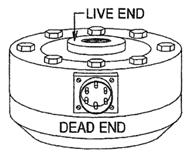
Figure 7. Loading ends of Low Profile cell
Generally, the Interface nameplate reads correctly when the cell is sitting on the dead end on a horizontal surface. Therefore, the user can use the nameplate lettering to specify the required orientation very explicitly to the installation team. As an example, for a single cell installation holding a vessel in tension from a ceiling joist, the user would specify mounting the cell so that the nameplate reads upside down. For a cell mounted on a hydraulic cylinder, the nameplate would read correctly when viewed from the hydraulic cylinder end.
Note
Certain Interface customers have specified that their nameplate be oriented upside down from normal practice. Use caution at a customer’s installation until you are certain that you know the nameplate orientation situation.
Mounting Procedures for Beam Cells
Beam cells are mounted by machine screws or bolts through the two untapped holes at the dead end of the flexure. If possible, a flat washer should be used under the screw head to avoid scoring the surface of the load cell. All bolts should be Grade 5 up to #8 size, and Grade 8 for 1/4” or larger. Since all of the torques and forces are applied at the dead end of the cell, there is little risk that the cell will be damaged by the mounting process. However, avoid electric arc welding when the cell is installed, and avoid dropping the cell or hitting the live end of the cell. For mounting the cells:
- MB Series cells use 8-32 machine screws, torqued to 30 inch-pounds
- SSB Series cells also use 8-32 machine screws through 250 lbf capacity
- For the SSB-500 use 1/4 - 28 bolts and torque to 60 inch-pounds (5 ft-lb)
- For the SSB-1000 use 3/8 - 24 bolts and torque to 240 inch-pounds (20 ft-lb)
Mounting Procedures for Other Mini Cells
In contrast to the rather simple mounting procedure for beam cells, the other Mini Cells (SM, SSM, SMT, SPI, and SML Series) pose the risk of damage by applying any torque from the live end to the dead end, through the gaged area. Remember that the nameplate covers the gaged area, so the load cell looks like a solid piece of metal. For this reason, it is essential that installers are trained in the construction of Mini Cells so that they understand what the application of torque can do to the thin gaged area in the center, under the nameplate.
Any time that torque must be applied to the cell, for mounting the cell itself or for installing a fixture onto the cell, the affected end should be held by an open end wrench or a Crescent wrench so that the torque on the cell can be reacted at the same end where the torque is being applied. It is usually good practice to install fixtures first, using a bench vise to hold the load cell’s live end, and then to mount the load cell on its dead end. This sequence minimizes the possibility that torque will be applied through the load cell.
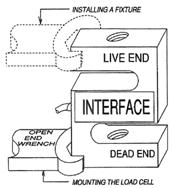
Figure 8. Reacting mounting and
installation torques
Since the Mini Cells have female threaded holes at both ends for attachment, all threaded rods or screws must be inserted at least one diameter into the threaded hole, to ensure a strong attachment. In addition, all threaded fixtures should be firmly locked in place with a jam nut or torqued down to a shoulder, to ensure firm thread contact. Loose thread contact will ultimately cause wear on the load cell’s threads, with the result that the cell will fail to meet specifications after long-time use.
Threaded rod used to connect to Mini Series load cells larger than 500 lbf capacity should be heat treated to Grade 5 or better. One good way to get hardened threaded rod with rolled Class 3 threads is to use Allen drive set screws, which can obtained from any of the large catalog warehouses like McMaster-Carr or Grainger.
For consistent results, hardware like rod end bearings and clevises can be installed at the factory by specifying the exact hardware, the rotation orientation, and the hole-to hole spacing on the purchase order. The factory is always pleased to quote the recommended and possible dimensions for attached hardware.
Mounting Procedures for Low Profile Cells With Bases
When a Low Profile cell is procured from the factory with the base installed, the mounting bolts around the periphery of the cell have been properly torqued and the cell has been calibrated with the base in place. The circular step on the bottom surface of the base is designed to direct the forces properly through the base and into the load cell. The base should be bolted securely to a hard, flat surface.
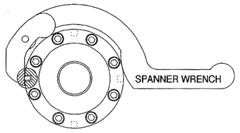
Figure 9. Using a spanner wrench
to hold base from rotating
If the base is to be mounted onto the male thread on a hydraulic cylinder, the base can be held from rotating by using a spanner wrench. There are four spanner holes around the periphery of the base for this purpose.
With regard to making the connection to the hub threads, there are three requirements which will ensure achieving the best results.
- The part of the threaded rod which engages the load cell’s hub threads should have Class 3 threads, to provide the most consistent thread-to-thread contact forces.
- The rod should be screwed into the hub to the bottom plug, and then backed off one turn, to reproduce the thread engagement used during the original calibration.
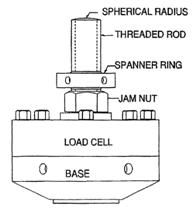
Figure 10. Load cell with
calibration adapter installed
- The threads must be engaged tightly by the use of a jam nut. The easiest way to accomplish this is to pull tension of130 to 140 percent of capacity on the cell, and then lightly set the jam nut. When the tension is released, the threads will be properly engaged. This method provides more consistent engagement than attempting to jam the threads by torquing the jam nut with no tension on the rod.
In the event the customer does not have the facilities for pulling enough tension to set the hub threads, a Calibration Adapter can also be installed in any Low Profile cell at the factory. This configuration will yield the best possible results, and will provide a male thread connection which is not so critical as to the method of connection.
In addition, the end of the Calibration Adapter is formed into a spherical radius which also allows the cell to be used as a straight compression cell. This configuration for compression mode is more linear and repeatable than the use of a load button in a universal cell, because the calibration adaptor can be installed under tension and jammed properly for more consistent thread engagement in the cell.
Mounting Procedures for Low Profile Cells Without Bases
| Model | Torque (ft-lb) | Torque (N-m) |
|---|---|---|
| 1210 | 5 | 7 |
| 1211 | 5 | 7 |
| 1220 | 45 | 60 |
| 1221 | 25 | 35 |
| 1231 | 80 | 105 |
| 1232 | 120 | 160 |
| 1240 | 250 | 350 |
| 1241 | 250 | 350 |
| 3210 | 5 | 7 |
| 3211 | 5 | 7 |
| 3220 | 45 | 60 |
| 3221 | 25 | 35 |
| 4211 | 5 | 7 |
| 4221 | 25 | 35 |
| 4611 | 5 | 7 |
| 4621 | 25 | 35 |
| Table 1. Mounting bolt torques | ||
The mounting of a Low Profile cell should reproduce the mounting that was used during the calibration. Therefore, when it is necessary to mount a load cell on a customer-supplied surface, the following five criteria should be strictly observed.
- The mounting surface should be of a material having the same coefficient of thermal expansion as the load cell, and of similar hardness. For cells up through 2000 lbf capacity, use 2024 aluminum. For all larger cells, use 4041 steel, hardened to Rc 33 to 37.
- The thickness should be at least as thick as the factory base normally used with the load cell. This does not mean that the cell will not function with a thinner mounting, but the cell may not meet linearity, repeatability or hysteresis specifications on a thin mounting plate.
- The surface should be ground to a flatness of 0.0002” T.I.R. lf the plate is heat treated after grinding, it is always worthwhile to give the surface one more light grind to ensure flatness.
- The mounting bolts should be Grade 8. If they can’t be obtained locally, they can be ordered from the factory. For cells with counterbored mounting holes, use socket head cap screws. For all other cells, use hex head bolts. Do not use washers under the bolt heads.
- First, tighten the bolts to 60% of the specified torque; next, torque to 90%; finally, finish at 100%. The mounting bolts should be torqued in sequence, as shown in Figures 11, 12, and 13. For cells having 4 mounting holes, use the pattern for the first 4 holes in the 8-hole pattern.

Figure 11. Mounting bolt
torque sequence, 8 holes
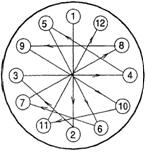
Figure 12. Mounting bolt
torque sequence, 12 holes
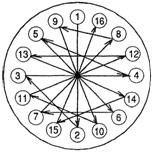
Figure 13. Mounting bolt
torque sequence, 16 holes
Mounting Torques for Fixtures in Low Profile Cells
The torque values for mounting fixtures into the active ends of Low Profile load cells are not the same as the standard values found in tables for the materials involved. The reason for this difference is that the thin radial webs are the only structural members which restrain the center hub from rotating with relation to the periphery of the cell.
The safest way to achieve a firm thread-to-thread contact without damaging the cell is to apply a tensile load of 130 to 140 % of the load cell’s capacity, set the jam nut firmly by applying a light torque to the jam nut, and then release the load.
Torques on the hubs of Low Profile cells should be limited by the following equation:
![]()
Where:
![]() allowed torque (in-Ib)
allowed torque (in-Ib)
![]() Rated Capacity of the load cell (lbf)
Rated Capacity of the load cell (lbf)
For example, the hub of a 1000 lbf Low Profile cell should not be subjected to more than 400 in-lb of torque.
Caution
Application of excessive torque could shear the bond between the edge of the sealing diaphragm and the flexure. It could also cause a permanent distortion of the radial webs, which could affect the calibration but might not show up as a shift in the zero balance of the load cell.


