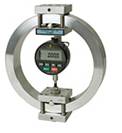
一个基本的称重传感器:该测力环

Figure 4. Proving Ring
For many years proving rings were considered the standard of excellence for force calibration. However, they suffer from the following adverse characteristics:
Creep
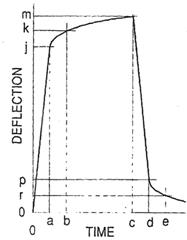
All solid materials exhibit a very small instantaneous elongation if a force is applied in tension. For compressive forces, the material will become slightly shorter. However, if we maintain the same force and continue to measure the length, we will see that the length continues to change slightly. If we plot the change in length versus time, we will arrive at the graph of Figure 5, which shows creep, and also shows creep recovery when the force is removed.

Figure 5. Creep versus time
A tool steel ring, such as the proving ring, has creep of about 0.25% of the applied force in the first 20 minute interval after application of the force. Referring to Figure 5, the force is applied from zero time to time “a.” The initial deflection is “j,” and then we see a rapid initial increase in length, followed by length “k” at time “b” and length “m” at time “c.” Note that, although the time “a to b” is equal to the time “b to c,” the increase in length “j to k” is much greater than the increase “k to m.” (The creep scaling is exaggerated in Figure 5, to demonstrate the principle.)
If we were to run a test for a much longer time, even weeks, we would continue to see a continuing but decreasing rate of creep, provided our measuring system had enough resolution to be able to detect extremely small deflections. Creep recovery follows a curve similar to the creep curve, but in a reverse sense.
Deflection Measurement
When forces are applied to the proving ring, it departs from its circular shape and becomes slightly egg-shaped. The determination of the deflection of a proving ring depends on the subtraction of two large numbers, namely, the inside diameter of the proving ring and the length of the micrometer measurement assembly. Since the difference is so small, any slight error in measuring either dimension leads to a large percentage error in the number at interest, the deflection.
Any mechanical deflection measurement system introduces errors which are difficult to control or overcome. The most obvious problem is resolution, which is limited by the fineness of the micrometer threads and the spacing of the indicator marks. Nonrepeatability of duplicate measurements taken in the same direction depends mainly on how much force is applied to the micrometer’s screw threads, while hysteresis of measurements taken at the same point from opposite directions is dependent on the preload, friction, and looseness in the threads.
Temperature Effects
Variation in the temperature of either the steel ring or the micrometer assembly will cause expansion or contraction, which will result in a change in the deflection reading. A first order correction would be to make all the parts out of the same material, so that their relative temperature effects are equal, causing them to cancel each other out. Unfortunately, this presumes that all the parts track each other in temperature, and this is not true in practice. A light shining on one side of the ring or a warm breeze from a furnace vent will cause differential warming, and a proving ring is very susceptible to temperature gradients in the proving ring mechanism. Also, the spring constant changes with temperature, thus changing the calibration.
Response to Extraneous Forces
The construction of a proving ring does not lend itself to the cancellation of extraneous forces, such as side loads, torque loads and moment loads. Any load other than a pure force through the sensitive axis of the ring can result in an extraneous output.
Conclusion
The proving ring requires specially trained personnel for proper operation because of the possibility of errors introduced by creep, and it is also subject to errors due to temperature and extraneous loads.


